Wednesday, April 23, 2008

Araxis Merge integration with TFS - Team System - Visual studio

I'm not a big fan of the built in Merge tool that comes with Microsoft's Team Explorer for Visual Studio.

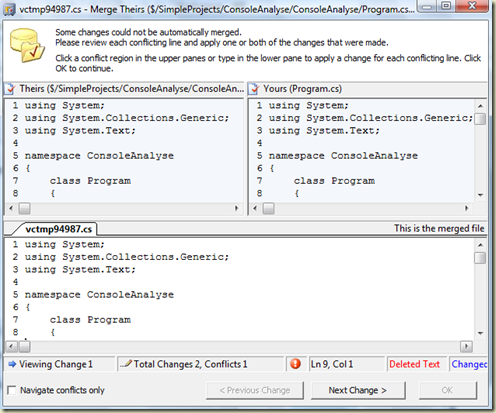
 Microsoft's Team Explorer built in Merge tool for Visual Studio

I really prefer Araxis Merge interface much much more.
So I have search for a way to integrate it into Team Explorer.

I easily found James Manning's blog about diff/merge configuration in Team Foundation which explains very clearly how to use the "Configure User Tools" under Tools -> Options -> Source Control -> Visual Studio Team Foundation Server".

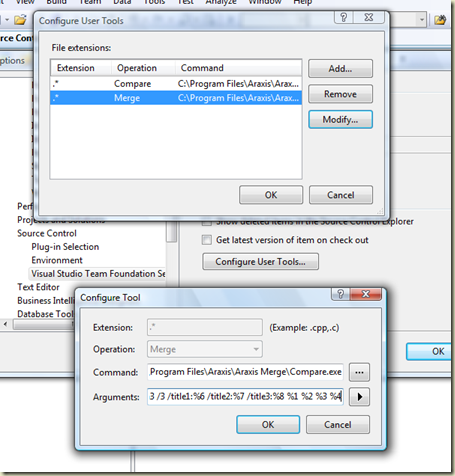
James tells you exactly what parameters you need to put in the Command's arguments:

/wait /swap /a3 /3 /title1:%6 /title2:%7 /title3:%8 %1 %2 %3 %4

Configure Tool Window

And it really works:

Araxis' 3-Way Merge

BUT...

James's settings work only for Araxis Merge Professional Edition (that supports 3-way merge and compare)

So if you only have Araxis Merge Standard Edition licence (that support only 2-way merge and compare), you need a little bit different setting:

/wait /2 /title1:%6 /title2:%7 %1 %2 %4

and actually I also prefer changing the titles from Microsoft's defaults (Yours, Theirs) to "Source" and "Destination", so my final arguments are:

/wait /2 /title1:Source /title2:Destination %1 %2 %4

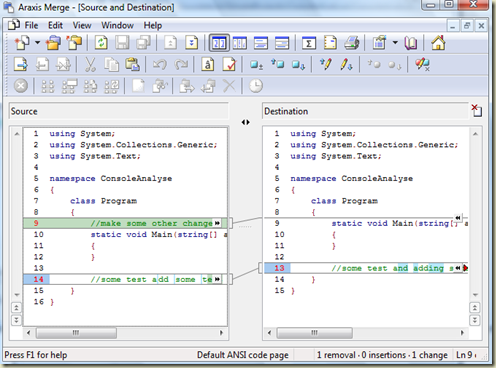
and it works! (using 2-way merge)

Araxis' 2-Way Merge

You just need to take into account that the 2-way isn't perfect as your first instinct would probably be to edit the Destination side, but you'll get a warning about "this file is read only". this is because Microsoft never intended that you will edit this file itself. They have created a fourth file (%4) which is the result of the merge.

You can workaround this by telling Araxis Merge to allow editing of the read only file.
This can be done on the specific file level:

Read Only alert 

Or globally by: View Menu -> Options -> Text Comparisons -> Editing -> Allow editing in read only files:

Araxis Options window

Anyway, even if you edit the "Source" file instead of the "Destination" file, Araxis will pass the saved file (if you click ctrl+s or the "save" button - Araxis save the current doc - meaning the doc where your cursor is in) to TFS.

It is a little dangerous as you might be on the wrong doc when saving.

You also have the option to just close the Araxis window without saving, which will pop up a window for you to decide which file you want to save as the merged file:

Save Merged File window

Conclusion:

If you can effort Araxis Merge Professional Edition - go for it.
If not - you can still integrate the Standard edition fairly well.

P.S.

There is one advantage in using the 2-way compare: when you have done lots of changes in one side - instead of copy all of them to the middle and then integrate the other side - you can right away integrate the less changed side into the other.

Just to let you know - You can use 2-Way merge on the Pro edition too.
Use the arguments I have supplied and it will work (because of the /2 flag)

another P.S.

You can find more Integration settings with other Source Control, Configuration Management and Other Applications in Araxis' Web Site
Monday, April 21, 2008

Found In Build - Team Build List - Make it Shorter

You have CI (Continuous Integration) Build running on each check in (or once a day) and the "Found In Build" drop down list in the Bug Work Item keeps growing each day...

You don't need all those builds there - you need only the build which QA actually deploy to their environment.

You can maintain this list manually by editing the Global List which TFS holds for each team project as described by Benjamin Day in Managing TFS Team Build History: Delete Completed Builds From "All Build Types" & Bug Work Item Drop-downs, but this is tedious work to do manually.

You can edit it with the "TFS Power Tools" new menu: 
Tools --> Process Editor --> Global List --> Open Global List from Server

Menu path to Global List editing 
Then select the build you want, right click it and select delete:

image

But it is still manual work.

You can actually use Jason Prickett's Blog to tell TFS which builds should get in the list from the start by adding conditions to the event subscription of the "Build Completion Event". but still you will be able only to filter the non successful builds - not all the builds except the deployed ones.

Actually the main issue here is Microsoft's decision to insert builds into the list on the "Build Completion Event".


So now to my (little chutzpa) solution:

  1. Delete the original TFS "Build Completion Event" subscription (as suggested by Jason) - BUT - don't recreate it with a filter.
  2. Write your own web service and implement TFS event handler web method for the "Build Status Change" Event (BuildStatusChangeEvent) (which should have been called "Build Quality Change Event" as it triggers only on quality changed)

    In this handler check if the Quality has been changed from NULL to something.
    If it's true - just call the Notify method on TFS WorkItemTracking Integration web service with the xml it waits for.

    You will need of course to build this xml and bring the missing information from the BuildStore service, but those are easy steps.

    Don't forget to set the HttpRequest's UseDefaultCredentials to true (or pass other valid credential) or you will get unauthorized exception from TFS.
  3. Subscribe your web method to the BuildStatusChangeEvent.

That's all!

Now all you need to do is to instruct your integration team to change the build quality of each build they take to deploy on QA environment from "Unexamined" (or null on TFS 2008) to "Ready For Initial Test".

The BuildStatusChangeEvent will be called, it will call Microsoft's original implementation of adding the build to the Global List, and this is exactly what I want.

See the code at the attached c# file: